Fresh Linux VPS Hardening Checklist: 7 Essential Steps Right After First Login
🇺🇦 Читайте цю статтю українською
You just provisioned a brand-new cloud instance on Hetzner, DigitalOcean, OVH, or Netcup. The provider emailed you an IP address and a temporary root password. The immediate urge is to jump right in, install Docker or Nginx, and launch your projects.
Wait. The public internet is an active war zone.
As we demonstrated firsthand in our Cowrie SSH Honeypot analysis, automated botnets and malicious scanners begin pounding on port 22 within 3 to 5 minutes of a public IPv4 address going live. Leaving your server in its default, out-of-the-box state makes compromise or inclusion in an automated botnet only a matter of time.
Here is an exhaustive, production-grade 7-step checklist to turn your freshly deployed Linux VPS into an impenetrable fortress before running a single application.
Distribution Note: All commands below have been tested and provided for both Debian / Ubuntu and enterprise RHEL-compatible distributions (AlmaLinux 9 / Rocky Linux 9 / RHEL).
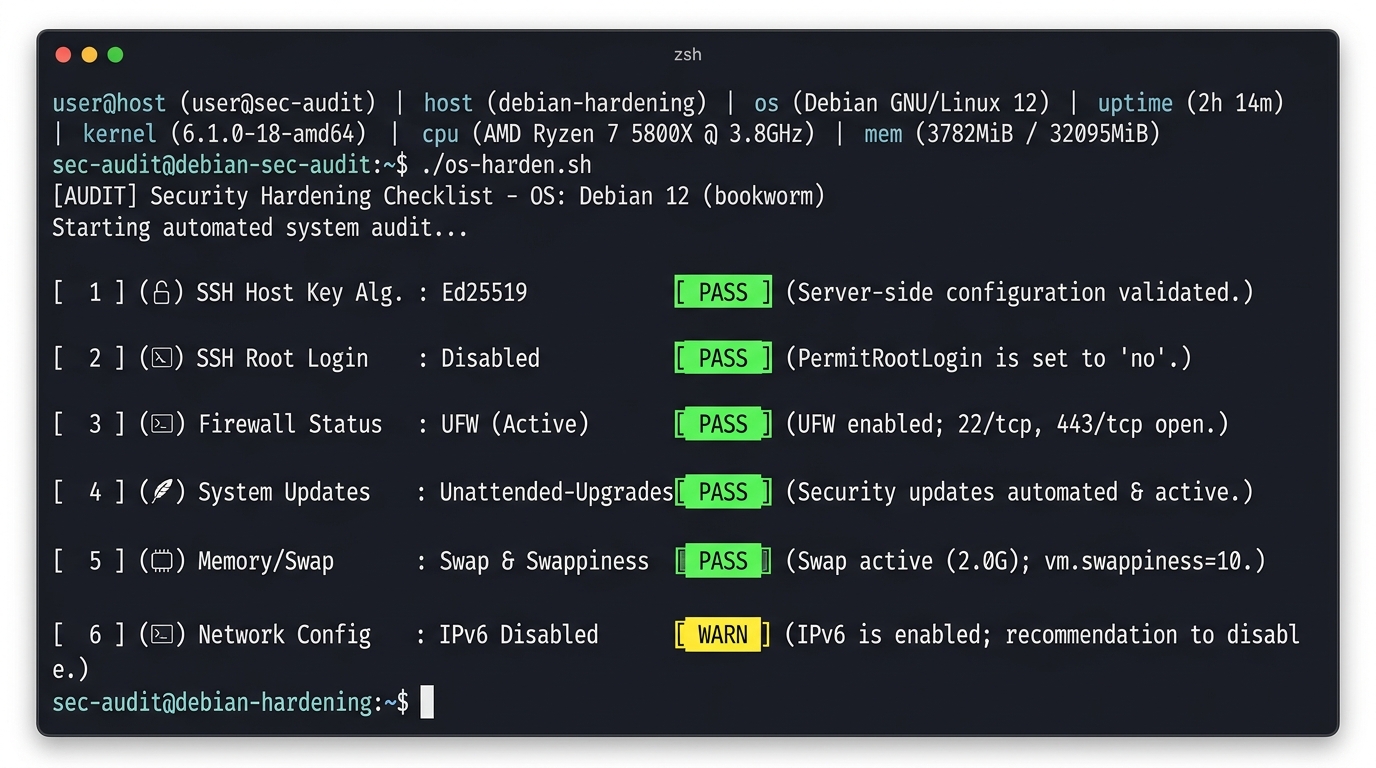 Fig. 1. Automated security audit results: Ed25519 cryptography, root access disabled, active firewall, and optimized memory swapping
Quick Reference Checklist
- Step 1: Complete package updates and enable automated security patches (
unattended-upgradesordnf-automatic). - Step 2: Create a dedicated unprivileged user and grant admin rights (
sudoorwheel). - Step 3: Modern SSH hardening: Ed25519 keys, password authentication disabled, direct root login forbidden.
- Step 4: Configure firewall rules (
ufworfirewalld) and neutralize Docker’s default bypass. - Step 5: Deploy Fail2ban intrusion prevention against automated brute-force attacks.
- Step 6: System hygiene: timezone synchronization (NTP) and 2 GB swap with
swappiness=10. - Step 7: Perform an open port socket audit before launching services.
Step 1. Initial System Update & Unattended Security Upgrades
Base OS images provided by hosting providers can sit in cloud repositories for months, often containing unpatched vulnerabilities.
For Ubuntu / Debian:
Update package lists and upgrade existing software:
1
sudo apt update && sudo apt upgrade -y
Install and configure automated security patches:
1
2
sudo apt install unattended-upgrades -y
sudo dpkg-reconfigure -plow unattended-upgrades
This registers an automated daily background service that applies critical security patches without breaking user configurations.
For AlmaLinux / Rocky Linux:
Update packages via DNF:
1
sudo dnf update -y
Install and activate dnf-automatic:
1
2
3
4
5
6
7
8
sudo dnf install dnf-automatic -y

# Configure automatic security patches:
sudo sed -i 's/upgrade_type = default/upgrade_type = security/' /etc/dnf/automatic.conf
sudo sed -i 's/apply_updates = no/apply_updates = yes/' /etc/dnf/automatic.conf

# Enable systemd timer:
sudo systemctl enable --now dnf-automatic.timer
Step 2. Create a Dedicated User & Abandon Root
Operating day-to-day as root is an operational hazard. A single accidental syntax mistake in a cleanup script or a malicious command executed in an untrusted container can immediately compromise the underlying host kernel.
For Ubuntu / Debian:
Create a new unprivileged system user (e.g., adminuser) and append them to the sudo group:
1
2
adduser adminuser
usermod -aG sudo adminuser
For AlmaLinux / Rocky Linux:
In the RHEL ecosystem, create the user with adduser, assign a password via passwd, and grant privileges through the wheel group:
1
2
3
adduser adminuser
passwd adminuser
usermod -aG wheel adminuser
Verification (Both Systems):
Switch to your new user with su - adminuser and run sudo whoami. The output must read root.
Step 3. Modern SSH Hardening: Ed25519 & Password Elimination
The overwhelming majority of internet-wide attacks are dictionary brute-force attempts targeting port 22. Disabling password-based authentication entirely neutralizes this attack vector.
1. Generate an Ed25519 Keypair on Your Local Workstation
Avoid legacy RSA 2048/4096 keys. The current industry gold standard is Ed25519—offering high cryptographic strength, compact signatures, and immunity to side-channel timing attacks:
1
2
# Run on your local computer (macOS / Linux / Windows PowerShell):
ssh-keygen -t ed25519 -C "adminuser@sedunlab"
2. Copy the Public Key to Your VPS
1
ssh-copy-id -i ~/.ssh/id_ed25519.pub adminuser@YOUR_SERVER_IP
3. Apply Hardened SSH Daemon Configuration
Rather than modifying the monolithic /etc/ssh/sshd_config, create an isolated drop-in configuration file:
1
sudo nano /etc/ssh/sshd_config.d/hardening.conf
Insert the following directives:
1
2
3
4
5
6
7
8
9
10
11
12
13
14
# Disallow direct root login
PermitRootLogin no

# Disable password authentication entirely
PasswordAuthentication no
KbdInteractiveAuthentication no

# Enforce public key authentication
PubkeyAuthentication yes

# Session restrictions
MaxAuthTries 3
X11Forwarding no
AllowTcpForwarding yes
Validate the configuration syntax before restarting the daemon:
1
sudo sshd -t
Reload the SSH daemon:
- On Ubuntu / Debian:
1
sudo systemctl restart ssh - On AlmaLinux / Rocky Linux:
1
sudo systemctl restart sshd
AlmaLinux / Rocky Linux Tip (SELinux):
If you decide to change your SSH listening port (e.g., to2222), inform SELinux beforehand; otherwise, the daemon will fail to bind:
sudo semanage port -a -t ssh_port_t -p tcp 2222
CRITICAL RULE: Do NOT close your current terminal session yet! Open a new, separate terminal window on your local machine and verify that you can connect using your key:
ssh adminuser@YOUR_SERVER_IP. Confirm that login succeeds without prompting for a password.
Step 4. Configure Firewall: UFW vs. Firewalld
A host firewall should enforce a strict default-deny policy, exposing only ports required for your services.
Option A: For Ubuntu / Debian (via UFW)
1
2
3
4
5
6
7
8
9
10
11
12
13
14
15
# Deny incoming connections by default
sudo ufw default deny incoming

# Allow outbound traffic
sudo ufw default allow outgoing

# Allow SSH (Port 22 or your custom port)
sudo ufw allow 22/tcp comment 'SSH'

# Allow web traffic
sudo ufw allow 80/tcp comment 'HTTP'
sudo ufw allow 443/tcp comment 'HTTPS'

# Enable firewall
sudo ufw enable
Check status: sudo ufw status verbose.
Option B: For AlmaLinux / Rocky Linux (via Firewalld)
AlmaLinux and Rocky Linux employ firewalld out of the box:
1
2
3
4
5
6
7
8
9
10
11
12
13
# Ensure firewalld is running and enabled
sudo systemctl enable --now firewalld

# Allow essential services
sudo firewall-cmd --permanent --add-service=ssh
sudo firewall-cmd --permanent --add-service=http
sudo firewall-cmd --permanent --add-service=https

# Reload configuration
sudo firewall-cmd --reload

# Inspect active zone
sudo firewall-cmd --list-all
⚠️ Universal Pitfall: Docker Bypasses the Host Firewall!
When you deploy applications using Docker and map ports (e.g., -p 8080:8080), Docker modifies host iptables PREROUTING chains directly, completely bypassing both UFW and Firewalld!
This means containerized ports become reachable by the entire public internet, even if your firewall is configured to drop them.
How to prevent this:
- Bind container ports strictly to the local loopback interface (
127.0.0.1) when routing traffic through a reverse proxy: ```yaml ports:- “127.0.0.1:8080:8080” ```
- Or on UFW systems, deploy ufw-docker to enforce host filtering across Docker bridge networks.
Step 5. Deploy Fail2ban Intrusion Prevention
Even with password authentication disabled, botnets will continuously flood your SSH port with connection attempts, filling log files and consuming CPU cycles.
Fail2ban monitors system authentication journals and automatically drops malicious IP addresses at the packet-filter layer.
Installation:
- On Ubuntu / Debian:
1
sudo apt install fail2ban -y
- On AlmaLinux / Rocky Linux:
Fail2ban resides in the EPEL repository:1 2
sudo dnf install epel-release -y sudo dnf install fail2ban fail2ban-firewalld -y
Configuration:
Create a persistent local configuration:
1
sudo nano /etc/fail2ban/jail.local
Add the following profile:
1
2
3
4
5
6
7
8
9
10
[DEFAULT]
bantime  = 1d
findtime = 10m
maxretry = 3
backend  = systemd

[sshd]
enabled = true
port    = 22
mode    = aggressive
Enable and start the service:
1
sudo systemctl enable --now fail2ban
View active bans anytime with: sudo fail2ban-client status sshd.
Step 6. System Hygiene: NTP, Timezone & Swap
Accurate server clocks are mandatory for log forensic analysis, cron schedules, and Let’s Encrypt TLS certificate handshakes.
1. Set System Timezone & Enable NTP (Identical across distros):
1
2
sudo timedatectl set-timezone Europe/Kyiv
sudo timedatectl set-ntp on
2. Configure a 2 GB Swap File
Budget cloud instances often run on 1–2 GB of RAM. During unexpected workload surges or container image builds, the Linux Out-Of-Memory (OOM) killer will abruptly terminate core processes.
Allocate a 2 GB swap partition:
1
2
3
4
5
6
7
sudo fallocate -l 2G /swapfile
sudo chmod 600 /swapfile
sudo mkswap /swapfile
sudo swapon /swapfile

# Persist swap across reboots:
echo '/swapfile none swap sw 0 0' | sudo tee -a /etc/fstab
3. Tune Swappiness
By default, the Linux kernel writes idle pages to swap too aggressively. Configure vm.swappiness=10 so swap is only utilized when available physical RAM drops below 10%:
1
sudo nano /etc/sysctl.d/99-custom.conf
Add the following values:
1
2
vm.swappiness = 10
vm.vfs_cache_pressure = 50
Apply immediately: sudo sysctl --system.
Step 7. Final Socket Audit: What Is Listening?
Before opening your server to production traffic, verify which services are actively binding to network interfaces:
1
sudo ss -tulpn
Confirm that no unauthorized daemons are listening on wildcard addresses (0.0.0.0 or :::) beyond your verified SSH service and configured firewall.
Conclusion: Production-Ready Security in 5 Minutes
By systematically walking through these 7 steps across either Ubuntu/Debian or AlmaLinux/Rocky Linux, you guarantee:
- Zero Brute-Force Exposure: Passwords disabled in favor of cryptographic Ed25519 keys.
- Defended Perimeter: Default-deny firewall active (
ufworfirewalld) with Docker container isolation. - Resource Stability: Swap protection prevents OOM crashes on cost-effective instances.
- Automated Maintenance: Kernel vulnerabilities patched automatically in the background.
Your server is now locked down and ready for deploying Beszel for observability or Coolify for autonomous application management!