Terminal Aesthetics & Productivity: The Complete Oh My Posh Guide for Windows, Linux & macOS
🇺🇦 Читати цю статтю українською мовою
A fresh operating system install leaves you with a stark, monochrome command line: a boring PS C:\Users\Username> prompt on Windows or user@hostname:~$ on Linux. It provides zero context on your active Git branch, no glanceable Node or Python virtualenv indicator, no build duration metrics, and no immediate visual status on command exit codes.
For years, the gold standard of terminal styling was the Oh My Zsh and Powerlevel10k stack on macOS/Linux, while Windows developers were stuck tweaking heavy, slow PowerShell scripts.
That paradigm has shifted. Oh My Posh, rewritten entirely in high-performance Go, has emerged as the definitive cross-platform prompt engine. Launching in sub-millisecond speeds, it delivers identical, gorgeous experiences across Windows Terminal (PowerShell 7 / Git Bash), Linux (Bash, Zsh, Fish), and macOS, packing over a hundred curated themes right out of the box.
Here is your complete guide to transforming your terminal into an aesthetic powerhouse on any operating system.
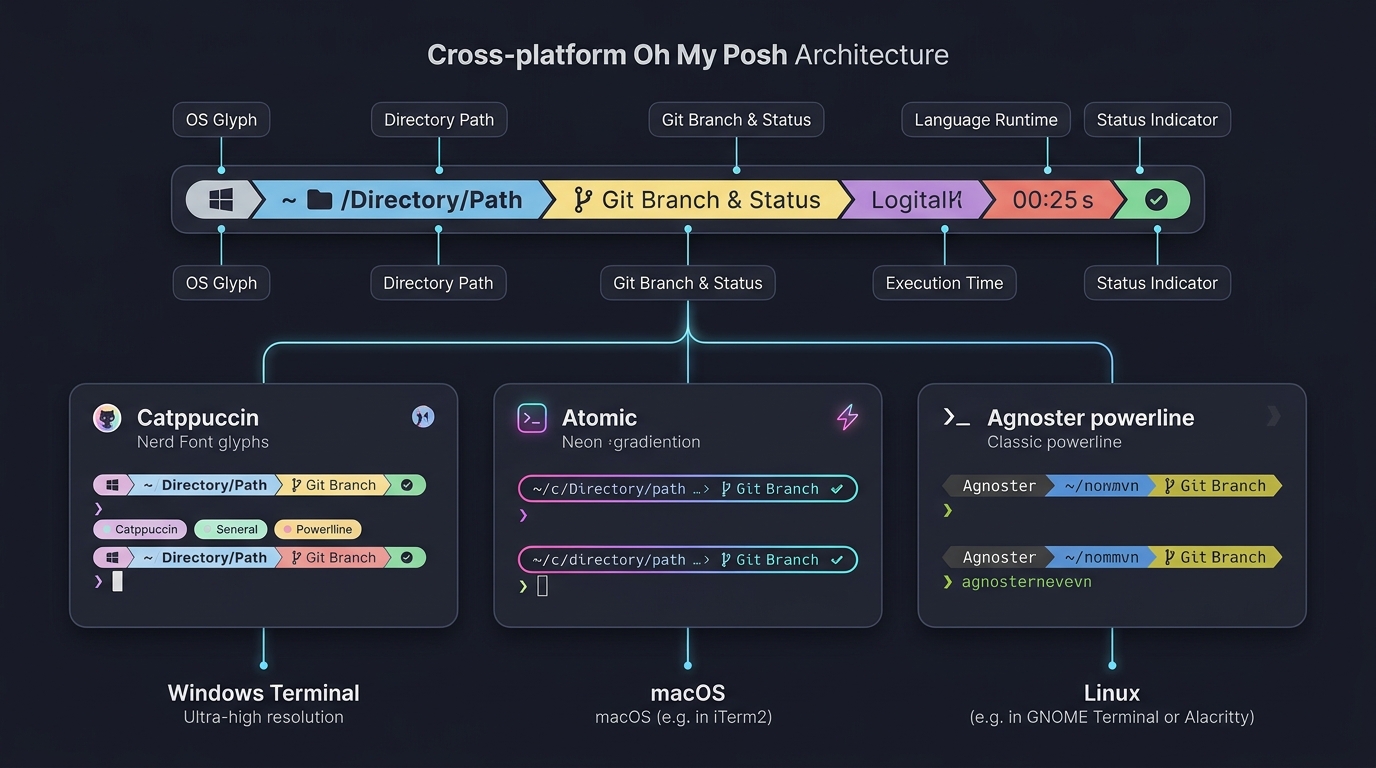 Fig. 1. Anatomy of a modern Oh My Posh prompt: OS badge, working directory, Git branch & status, execution timer, and exit code telemetry
Step 0: The Core Requirement — Installing Nerd Fonts
Before diving into themes and segments, remember the golden rule of terminal customization: without a patched font, icons will render as broken square glyphs (▯) or question marks.
To render modern prompt glyphs (Git branch markers , OS badges, folder symbols, execution clocks), you must use a Nerd Font — standard monospace developer typefaces augmented with thousands of vector glyphs.
The Fastest Method: Built-in Font Downloader
Oh My Posh features an interactive font installer:
1
oh-my-posh font install
Use your arrow keys to select a top-tier monospace font:
Meslo LGS NF— The classic, perfectly aligned standard for powerline glyphs.JetBrains Mono NF— A developer favorite with clear coding ligatures.Fira Code NF— Sleek programming ligatures for operators and arrows.
Crucial: Enable the Font in Your Terminal Emulator
- Windows Terminal:
PressCtrl + ,(Settings) → select Defaults in the left sidebar → Appearance → under Font face, pickMesloLGS NF(orJetBrainsMono NF) and hit Save. - macOS (Terminal.app or iTerm2):
Preferences→Profiles→Text→Font→ select your installed* Nerd Font. - Linux (GNOME Terminal, Alacritty, Kitty):
Open your terminal profile preferences, toggle Custom Font, and select your Nerd Font.
Step 1: Installing Oh My Posh
Because Oh My Posh ships as a compiled Go binary, installation takes a single command on any platform:
1
2
3
4
5
6
7
8
# 🪟 Windows (via native winget package manager):
winget install JanDeDobbeleer.OhMyPosh -s winget

# 🍎 macOS (via Homebrew):
brew install jandedobbeleer/oh-my-posh/oh-my-posh

# 🐧 Linux (official automated installer):
curl -s https://ohmyposh.dev/install.sh | bash -s
[!NOTE] On Linux, the script places the binary in
/usr/local/binor~/.local/bin. Ensure that directory is present in your$PATH. Verify your installation anytime withoh-my-posh --version.
Step 2: Activating in Your Shell Profile
To launch your custom prompt automatically with every new terminal window or tab, append the initialization hook to your shell configuration file.
1. PowerShell (Windows / Linux / macOS)
Open your PowerShell profile in your preferred editor:
1
notepad $PROFILE
(If Notepad indicates the file does not exist, initialize it with New-Item -Path $PROFILE -Type File -Force and re-run).
Append the following line to the end of the file:
1
oh-my-posh init pwsh | Invoke-Expression
Save and restart your terminal, or reload instantly with . $PROFILE.
[!TIP] If Windows throws a “running scripts is disabled on this system” error, run this one-time command in an unprivileged PowerShell window:
2. Bash (Linux / Git Bash on Windows)
Edit ~/.bashrc:
1
nano ~/.bashrc
Append:
1
eval "$(oh-my-posh init bash)"
Apply immediately: source ~/.bashrc.
3. Zsh (Default on macOS / Linux)
Edit ~/.zshrc:
1
nano ~/.zshrc
Append:
1
eval "$(oh-my-posh init zsh)"
Apply immediately: source ~/.zshrc.
Step 3: Exploring and Switching Themes
Oh My Posh bundles over 100 pre-configured themes right out of the box.
Preview All Themes in Real Time
Run the live preview utility:
1
2
3
4
5
# In PowerShell:
Get-PoshThemes

# In Bash / Zsh:
oh-my-posh get themes
Your terminal will print an interactive catalog rendering every theme using your current font and palette!
Top 5 Aesthetic Community Themes:
catppuccin(orcatppuccin_mocha): Soft pastel tones; currently the most viral aesthetic in developer workspaces.atomic: A multi-line technical dashboard featuring battery levels, memory consumption, Git telemetry, and execution runtimes.jandedobbeleer: The signature rounded Powerline classic crafted by the creator of Oh My Posh.paradox: Clean, chevron-divided segments reminiscent of vintage Agnoster.tokyonight_storm: Deep moody violet and cyber-blue hues inspired by Tokyo after dark.
How to Apply a Chosen Theme
All bundled themes are cached locally. Simply pass the --config parameter during shell initialization:
In Windows PowerShell ($PROFILE):
1
oh-my-posh init pwsh --config "$env:POSH_THEMES_PATH/catppuccin.omp.json" | Invoke-Expression
In Linux / macOS (~/.bashrc or ~/.zshrc):
1
eval "$(oh-my-posh init zsh --config ~/.cache/oh-my-posh/themes/catppuccin.omp.json)"
[!TIP] Load directly from GitHub: If you prefer not to manage local paths, you can reference the raw config URL directly:
Step 4: Pro-Tier Productivity Add-ons
A stunning prompt is only half the battle. Let’s add smart IDE-like predictions and file icons to complete your setup.
For Windows Terminal & PowerShell Users:
Install these two game-changing modules:
1
2
3
4
5
# 1. File and directory glyphs when running 'ls' or 'dir'
Install-Module -Name Terminal-Icons -Repository PSGallery -Scope CurrentUser

# 2. Advanced predictive command line history
Install-Module -Name PSReadLine -Repository PSGallery -Scope CurrentUser -Force
Add these configuration lines into your $PROFILE to activate Fish-style ghost text completions (accept matching suggestions with the right arrow key →):
1
2
3
4
5
6
7
8
# Import icons
Import-Module Terminal-Icons

# Inline intelligent history predictions
Set-PSReadLineOption -PredictionSource HistoryAndPlugin
Set-PSReadLineOption -PredictionViewStyle InlineView
Set-PSReadLineOption -Colors @{ InlinePrediction = '#71717a' }
Set-PSReadLineKeyHandler -Key Tab -Function Complete
Now, running ls displays dedicated badges for .json, .py, .ts, folders, and archives, while long commands autocomplete in real time!
For Linux & macOS (Zsh) Users:
Install the community favorites zsh-autosuggestions and zsh-syntax-highlighting:
1
2
3
4
5
# Ubuntu / Debian:
sudo apt install zsh-autosuggestions zsh-syntax-highlighting -y

# macOS (Homebrew):
brew install zsh-autosuggestions zsh-syntax-highlighting
Add them to ~/.zshrc:
1
2
source /usr/share/zsh-autosuggestions/zsh-autosuggestions.zsh
source /usr/share/zsh-syntax-highlighting/zsh-syntax-highlighting.zsh
Step 5: Common Pitfalls & FAQ
1. Icons are rendering as square boxes or question marks
- Cause: The font is installed on your OS, but not selected in your terminal profile.
- Fix: Open Windows Terminal (or iTerm2) settings and explicitly set
Font facetoMesloLGS NForJetBrainsMono NF.
2. Noticeable lag when opening new tabs
- Fix: Add the
--manualflag to suppress redundant update checks:1
oh-my-posh init pwsh --config "$env:POSH_THEMES_PATH/catppuccin.omp.json" --manual | Invoke-Expression
Ensure your shell profile isn’t performing slow network calls on startup.
Command Quick Reference
| Action | Command |
|---|---|
| Upgrade Oh My Posh | winget upgrade JanDeDobbeleer.OhMyPosh / brew upgrade oh-my-posh |
| Install Fonts | oh-my-posh font install |
| List All Themes | oh-my-posh get themes or Get-PoshThemes |
| Export Theme to Custom File | oh-my-posh config export --output ~/.mytheme.omp.json |
| Check Current Version | oh-my-posh version |
Final Thoughts
Customizing your command-line environment isn’t mere eye candy. Having instantaneous clarity on dirty Git trees, Python virtual environments, container contexts, and task runtimes reduces mental fatigue and prevents costly mistakes.
Oh My Posh provides that superpower in seconds across any platform you touch. Pick your favorite theme, dial in your font, and make your terminal an inspiring place to build!